Screen printing is a designing technique most popular for tee shirt printing, plastic and metallic printing of designs, logos, labels, signage and instructional notes etc. silkscreen printing is one of most used and most versatile process of printing industry. Silkscreen printing process was first invented China, though the silkscreen printing process was a bit different for stenciling screen as it is today, silkscreen printing was introduce in west and Europe in 19th century and but screen got importance and its status in 20th century. In the beginning of the 20th century the photo-reactive paint method were introduced to screen printers. With more development in technology the silk mesh was replaced by synthetic polymers, the blocking holes method was replaced by photo-emulsion, and process of silkscreen printing was made fast, efficient, easy and very neat and clean.
Basic requirements of screen printing:
- A wooden rectangular frame plastic tape and nails
- A silk or polyethylene mesh
- Photo-emulsion paint
- Squeegee and scoop coater
- Article to be screen printed e.g. tee shirt
- Colorants for screen printing design
- A black opaque design one butter paper or plastic sheet
- 1000 watts flood light bulb for exposing screen
- Wash room pipe or garden hosepipe nozzle,
- Drier (if you can afford then drying unit)

Process of screen printing:
- First of all start with one side of the screen and nail the mesh on the screen using nail, then stretch the screen as strongly as it is possibly could be and then nail the mesh on the screen from opposite side, similarly do for other sides of the screen but there should not a single wrinkle on the mesh when stretched it should has maximum tension.
- Then using plastic tape, tape the edges of the screen from both sides properly it not only makes you screen water proof but also helps to retain its tension.
- Prepare the photo-emulsion and then coat it on the screen on both sides using scoop coater. Place your screen for drying in a dark room for drying. You can learn details of this step in other tutorial video for preparing emulsion.
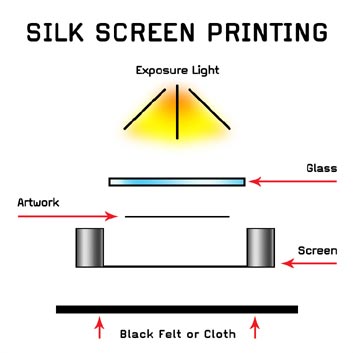
- After the screen is dried the dark design paper which you want to screen print on you article being screen printed is placed on the screen on upper side an then this side is exposed to bright light of flood light bulbs or bright sunlight for proper time period,
- It may take less than 10 minutes under flood light bulbs, and in bright sunlight of summer noon it can take 20 minutes to 25 minutes, and it can vary with time of the day and season. We have complete discussion on this topic of screen printing here on this website.
- After the exposure the screen is washed with water using wash room pipe or garden hosepipe nozzle,
- The colorants are prepared by mixing different types of the compound like elka stron, binder, water, color etc.
- Then the screen is dried and placed on the article being screen printed.
- Colorant are poured on one side of the screen and then squeegee is used to spread it all over the screen pushing colorant down on the screen printing article called as substrate.
- Then the screen printed article i.e. screen printed tee shirts, screen printed cards etc. are dried.


