
")
Company Blog
Products for Filtration, Separation, Sifting and Printing
Printer Guidebook---Screen Mesh 2
- Font size: Larger Smaller
- Hits: 9560
- Subscribe to this entry
- Bookmark
Thread structure
The differences between multi-filament and mono-filament screen-printing mesh.
Here is an easy choice: when faced with multi-filament and monofilament polyester mesh, pick high-quality monofilament. Man-made fibers are made with either multiple or single filaments. Monofilament is a single smooth round fiber used in weaving mesh.
These threads are extruded in very long lengths-even miles. Multifilaments differ from monofilaments in that the final thread for weaving is composed of several filaments combined into a single yarn. They are formed by having many holes in the polyester-extruding spinerette, instead of one.
Before the widespread manufacture of monofilament mesh (in the early 80s), multifilament was cheaper. Today, there is little price advantage to buying multifilament, and the extra trouble to degrease, reclaim and get ink to transfer through it is not worth the effort. As a printing mesh, multifilament fibers are not as uniform as monofilament which makes the ink deposit irregular.
Modern monofilament can be taken up to its ultimate mesh tension with little trouble, whereas multifilaments, because of all the internal friction, can't go as high. The development of modern capillary films that don't require the rough surface of multifilament to get the film to adhere to the mesh have also led to the diminishing popularity of this mesh.
To identify monofilament, examine the mesh itself with a loupe or microscope and you'll have no trouble identifying the difference. If you discover you still have a roll of multifilament, decide if you can afford the increase in processing time it will force upon you ... then get rid of it.
Thread diameter
Measured in microns, the differing diameters of individual mesh threads affect ink transfer.
Mesh companies typically use a letter code to designate different thread diameters for a mesh count. Unfortunately, not all mesh manufacturers share the same codes. I suggest, therefore, you describe each mesh by it's thread count, weave-type and thread-diameter measurement, rather than the letter code.
Compile your own list of meshes from manufacturers and use any available charts or tables that list comparative mesh characteristics. (I use Tension Chart No. 9 from Stretch Devices which lists the ultimate breaking strength and suggested working range for most meshes; there are others.)
Threads come in all sorts of diameters and the simple metric numbers are easier to remember than the complex English ones. Don't use thousandths of inches when referring to mesh diameters, because they'll distract you with decimal points, zeros and those pesky little inch marks (").
Metric vs English*
|
160 |
vs |
.00629" |
|
120 |
vs |
.00472" |
|
80 |
vs |
.00314" |
|
55 |
vs |
.00226" |
... and so on.
Both systems' increments are only used for comparison anyway-in our heads or in calculations-so I recommend using microns to compare mesh diameters, regardless of how you may feel about the metric system, overall.
Even more interesting is the fact that thread of a given diameter can be woven into many different mesh counts. For example, 34-micron threads (wouldn't you rather say "thirty-four-micron" than "thirteen thousandths of an inch"?) is used to make counts of 420, 380, 355, 305 and 280.
Because of the extra threads per inch, 420 mesh is actually stronger than 280 mesh. Although the threads may be thin, there are 140 more of them per inch. There is strength in numbers.
For example, 305 mesh can be woven from 31-, 34- or 40-micron threads. As textile printers, we typically use the middle choice, because, although we can't afford to sacrifice too much strength, we need as much deposit as possible to overcome what is absorbed by the substrate.
Measuring
The thread measurements on our charts reflect the diameter after extrusion, rather than after the tortures of the manufacturing process. To measure true thread diameter, use a microscope or loupe with a measuring reticle. Measure the thread at the center of its span from intersection to intersection. You can also measure a single thread with a micrometer.
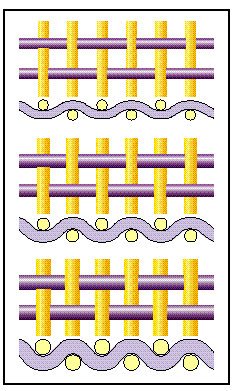
This illustration of three different mesh diameters demonstrates the different characteristics possible within a given mesh count.
Behavior
As is true in the area of mesh tension, the habits we have acquired over our years of experience can delay a transition as we use different thread diameters and don't notice how they change our results. Thicker threads can make a person who only pays attention to mesh count think that a mesh is behaving like a lower or higher count. The fact is that changing any of the variables of the mesh can make it behave like another mesh under other conditions. During the 1980s, for example, many printers commented about how a high-tension 160 mesh behaved like a low-tension 200. (This is why driving instructors hate to teach people how to drive in the rain.)
Overall mesh thickness-although greater than thread diameter, because it's a function of two threads woven over and under each other-is usually something less than two times thread diameter and is the strongest influence on ink deposit. You have to measure thickness exactly because weaving and heat setting at the factory flattens the intersections rendering the threads wider than they are tall.
Most ink-deposit changes are made by going to a higher or lower mesh count which usually changes the mesh
thickness. (We say "usually" so you are forced to check your charts yourself and see what the difference will be.)
Using a higher mesh count such as 305 means you're likely to be printing halftones and might get some benefit in terms of ink-deposit control by choosing different thread diameters from the same mesh count. For example, a thinner 305 thread-count (31-micron) mesh, will produce a thinner ink deposit than a thicker 305 thread-count (40-micron) mesh. These choices require actual testing because we all use different inks and substrates.
Durability
Because thread thickness plays a role in the overall stability and strength of the fabric, thicker meshes will offer more mechanical and chemical resistance, as well as longer mesh life, than their thinner counterparts. The thinnest threads (in this case, 31-micron) are not as durable, but offer better detail. The middle choice (34-micron) will be stronger without as much detail, but with a thicker ink deposit.
Mesh count
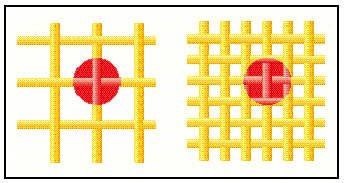
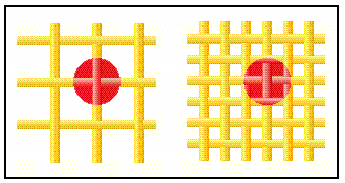
A mesh count-the number of threads per inch-should be selected with ink deposit, ink flow and mesh strength in mind.
Mesh count is measured by counting the number of threads per inch or per centimeter. You can find the range of mesh counts your supplier sells in its product chart. Notice how some mesh counts are made of different thread diameters; this changes the percentage of open area and mesh thickness.
 Ink flow, ink deposit and stencil support are all considerations when determining mesh count.
Mesh counts are typically only estimates, because of the limitations of the weaving process. They are different in both the warp-threads running the length of the bolt-and the weft-threads running across the bolt (remember this by thinking "weft and [w]right"). Inconsistencies in mesh counts are rarely important, though, even between mesh brands, because only actual testing under your shop conditions can be relied upon to determine actual ink deposit.
Measuring mesh count
For any screen-printing application, a mesh should be selected with ink deposit and ink flow in mind, but chosen according to both mesh count and thread diameter, the combination of which will define open area
To measure a mesh count, use a commercial mesh tester. This can be a test-film-positive with a design that makes a distinctive moiré pattern that will indicate the count of the mesh being measured. A slower but more accurate method requires a linen loupe and something pointy to help you keep your place. You measure an inch then, through the loupe, count the threads with your pointer. After two or three tries, most people use the short-cut method of counting a quarter of an inch and multiplying by four to save time. The odd mesh count numbers (305, 330, 355) stem from the fact that mesh is woven in Europe and based on the metric system.
An obvious question when troubleshooting a problem print on the press is: "What's the mesh count?" To often, nobody knows and we have to guess or try to find enough open area in the screen to count, which wastes time. To make matters worse, even if they write it on the mesh, many screen makers cover the mesh-count label with tape. Don't let them do it. Insist on visible mesh counts!
Mesh count is probably the most often-used screen modification. Choosing a higher or lower mesh count usually creates the most measurable change in ink deposit or ink flow, but we should first consider mesh that will support our stencil before considering ink deposit and flow.
Fineness of line
When threads are far apart, they can't support thin or fine stencil lines. Small halftone dots are nothing but very short lines and must have something to support them or even casual cleaning of the stencil will knock them off the mesh.
As everyone knows, you need to make a formal test with different line thicknesses and different dot sizes in order to calibrate your screen exposure. When you actually print a screen with this test pattern under your conditions, you will see how fine a line you can print with each different mesh count.
Tension and tack
Mesh tension is also effected by mesh count. Generally, the more threads of a given size there are, the stronger the mesh is, and the better it will be able to withstand high tension.
Along with support for the stencil, many printers use a method (that happens to be the opposite of litho printing) called "increased tack." This means that if you lower the mesh count as you work through the print order, you may enjoy better trapping and reduced ink build-up on the bottoms of your screens. By starting with a high mesh for background, light color and small area size, you reduce the amount of extra ink buildup on the bottoms of the screens.
It is also a given that increasing the mesh count (choosing a higher one) will decrease ink deposit because of smaller open area and thinner mesh.
Mesh Selection Guidelines
|
Printing type |
Mesh Count (per inch) |
|
General Printing: |
|
|
Light Grounds |
125 - 160 |
|
Dark Grounds |
86 - 110 |
|
Underprinting: |
|
|
Underbase White |
140 - 160 |
|
Optical White |
95 - 125 |
|
Clear |
125 - 156 |
|
Overprint colors |
140 - 230 |
|
Athletic |
60 - 76 |
|
General Puff |
76 - 86 |
|
Fineline Puff |
110 - 140 |
|
Glitter |
13 - 24 |
|
Metallics |
60 - 76 |
|
Water-based |
110 - 156 |
|
Transfer: |
|
|
Opaque |
60 - 76 |
|
Soft Hand |
125 - 156 |
Support Team